Friday 27 October 2017

Of Muck and Raspberries

I thought that it might be useful to show the basic ground cover method that I have now started to use on my 009 project. This basic layer is my gunk mix (emulsion paint/PVA and powdered filler) painted on, and a blend of Woodland Scenics Fine Turf and very fine sand sieved over it whilst wet.


There are few bald patches, some of these are intentional as part of the effect that I'm after and will be blended in to the end result. Others will be hidden under the next layer and mainly occur around the edges as the mix seems to dry quicker there.  The large gap at the top is where a building and scenic feature will be positioned.

Jobs like this take advantage of short windows of opportunity. The previous morning a task I undertook was to add some raspberry bushes along the lane. The producer is Tasma Products and the range can be found here (but trade-only). These went into holes drilled in the scenery, glued with PVA. I did give the bushes a blast of hairspray before sticking them in as I feared loosing the berries and leaves!

ModelsOct1723.jpg

I have used 6 out of the 12 in the pack and I think that might be enough, there is a group of three as seen above, plus one on the right of the shot. The other two can be seen in the shot below, previously rejected until I played about with the photo editing software on my phone! I think that they are a good product, if a little pricey, but I couldn't easily make that myself very quickly so that's my excuse. Maybe I can use some of the unused examples on an O9 project in the future?


Colin

Tuesday 24 October 2017

Touching in my Roots

When I bedded in the taller of the trees on the 009 project (Hornby describe this one as a Sycamore). I thought it might be useful to take some pictures on my phone as I did.

Here is the tree as glued in with Gorilla PVA before I started to blend it in.


The 'gunk' mix, it lives in an old tester pot that formed it's basis some time ago (this mix is towards the end if it's life despite a recent revival). Application will be by dental tool.


Applying the mix and getting some shape to the top of the roots.


Applying acrylic paint, whilst the plaster mix was still wet underneath.


That's basically it - the colour I mixed is not that close a mix to the Hornby colour and I may need to touch in some visible bits of the original colour at the top of the tree to blend it all together.

Colin

Friday 20 October 2017

More Green Grass... and Trees Too!

I thought I would share a few more pictures of progress with scenery on my (whisper it) 009 project. When this was last seen on the blog I had added hanging basket grass to the cutting side and some basic ground cover elsewhere.

After some thought about whether to change tack and go for a ground foam based approach, I continued on with a few changes to approach, notably using my 'gunk' mix - emulsion paint/PVA/filler - as the basis for ground cover, quickly adding a sieved on layer of Woodland Scenics 'Fine Turf' whilst wet to give a good mix of colour and texture. This finish can be seen in the picture below, with the addition of a representation of tree roots made using string and covered in more gunk. This makes up for the lack of any roots on the Hornby Skale Scenics trees.


Dead leaves, in the form of tea leaves and a sprinkle of sawdust, were added to the ground and held in place with PVA and matt medium. The Peco flexible fencing was left over from my 4mm 'Inglenook' project years ago. I had sprayed this with matt varnish for that project but the stuff is so damn flexible the paint falls off it! It was weathered with acrylics prior to installation and touched back in again afterwards where the paint was chipped during installation. The trees were fixed in place using 'Gorilla' PVA and once set the roots were joined to the trunks using more gunk and colour blended in with acrylic paints.


These images also illustrate my experiments with scrubby bushes. These were made as a batch on the workbench using Green Scene meadow grass mat, torn into random shapes, scrunched up and sprayed with hairspray then sprinkled in various foams. They are PVA'd in place once left overnight for the hairspray to dry. Some of these growths have appeared in the cutting at the top of the rock face.


This is the present state of the project. The tree at the right is another Skale Scenics example treated in the same manner as the smaller ones, including a waft of matt varnish over the branch structure; a few bald patches given extra density using offcuts of hanging basket liner and the whole thing covered in hairspray and given extra foliage coverage. This is good practice for the next trees which will be newer growths made using sea foam.
 

Colin

Friday 6 October 2017

Box it Up

Not directly O9 related but the main focus of recent modelling time, I have now completed construction of a protective/display box for my 009 project. This is a miniature version of that used under 'Shifting Sands' and based on those used by Steve Bennett under his various micro layouts.

Construction is simple, 5 hardboard panels and 12 x 21mm pine section. Each side panel is framed top and sides with the pine section, then left for the PVA to set. After some tidying up of edges I paired each side and end and joined, the picture below was taken at this point. At this point the volume occupied by a very small layout seems to increase dramatically...


Having assembled the two halves I added the top and once everything was together all the edges were sanded smooth and the timber was given a couple of coats of varnish with a rub down in between. On the top four triangular pieces of plywood are in place to hold the layout in place whilst in use.


Bolting the layout inside is achieved with four M4 machine screws locating in captive bolts underneath the baseboard, located within blocks of wood. On the left you can see that there is an additional length of stripwood within the box edge. Whilst I would like to say that this is intentional to accommodate the plug sockets that extend beyond the board edge on this side, it is more a case that I was a little too generous in the clearances within the box!


Colin

Sunday 1 October 2017

Not Quite DA1

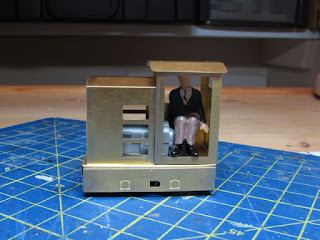
Over the summer I received a couple of test etches from A1 Models for new O9 kits designed to fit the Tomytec 4w chassis. The first that I have tackled is very much based on the shape of 'DA1', the ex-Bush Mills Railway diesel at the Cleethorpes Coast Light Railway.


The kit is very much an 'inspired by' rather than an accurate model. There are compromises to the width of both bonnet and cab, the arrangement of grilles etc. When I first assembled everything I found that the chassis etch seemed to work against usual convention by having very wide etch lines on the outside of the fold and I wasn't too happy with how this looked.


There is just room in the cab for a suitable figure, although tall, whitemetal 1/43rd scale figures may need to reconsider their application to drive...


After discussing the chassis etch with John Flower at A1 he indicated that it was intended to be built with the fold on the inside, despite this loosing the etched axlebox detail to the inside. As he had included some spare chassis frame etches I was able to build up another inside out and apply a degree of customisation . Having built up the width of the model to a scale 3ft by adding a 10 thou styrene footplate and added new buffer beams from 20 thou styrene, I opted to cut the axleboxes off the first frame, fit them in place and add some very basic detail around them. 


Just visible is that I have also started work on some very basic cab interior detail including a driver's seat, but this may be subject to change as I may have not left quite enough space for a driver... Ooops!

More as time permits.

Colin